65 Mustang BlastShield
A few years ago there were
several television programs showing what was supposed to
be a design flaw in the Mustang. In a severe rear end
crash, the gas tank would rupture and gasoline would
splash through the rear seat into the passenger
compartment and burn the occuppants. There have been many
many arguments about the validity of the television
report, to the point that I consider it an un-winable
argument. The reason I built the blast shield described
here was that I saw a frame-by-frame film of the rear end
crash, and the gasoline did splash into the compartment.
One thing about the film that
was different than the television reported crash was that
the fuel did not go through the rear seat. The collision
buckeled the trunk lid, broke out the rear glass, and
ruptured the tank. Fuel and the fireball went through the
buckeled part of the trunk lid and was sprayed into the
compartment through the broken out rear glass. No kind of
shield could have stopped this fireball.
My goal in making this shield
was to stop another easy route for gasoline from a
ruptured tank that exists in the rear package shelf
behind the rear seat. This shelf has large cutouts for
speakers and provides no protection from a gasoline
explosion in the trunk. I think a panel positioned behind
the package shelf will provide at least some measure of
protection.
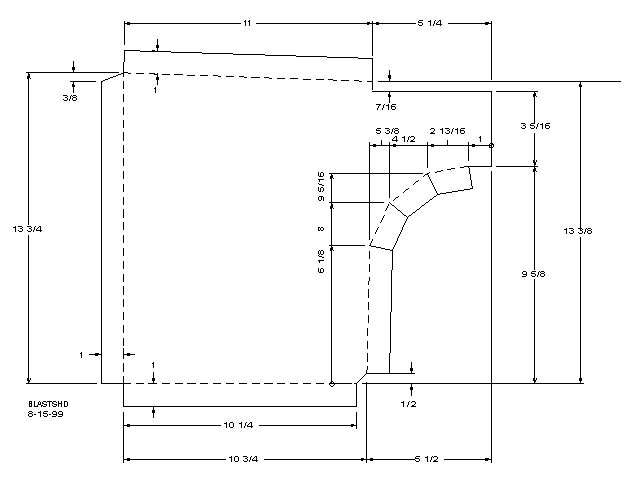
The shield is made from four
pieces of sheet metal, this panel fits behind the rear
seat to slow the fireball that may occur during a
rear-end collision. The panel is positioned behind the
package shelf to prevent fuel and flames from passing
through the rear speaker cutouts. Construction is
simplified, strength is improved, and sealing is
tightened by using four panel pieces instead of a more
conventional single piece of sheet metal.
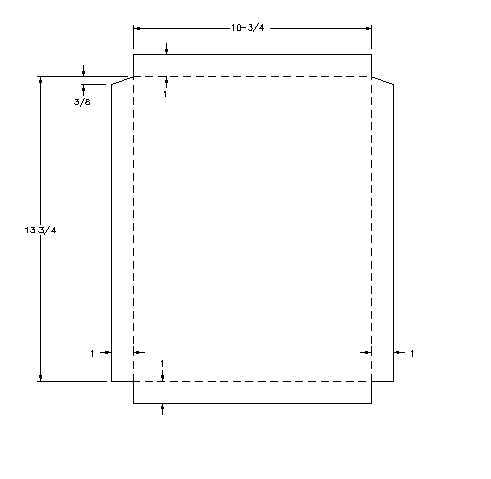
Below are the cutout diagrams
for two of the panels. Make two sets from each layout and
then bend the tabs in the oppossite directions for right
and left side.
INSTALLATION
Remove the rear seat.
The bent lip goes inside,
toward the rear seat. Okay, toward where the rear seat
was before I told you to remove it. I pre-drilled holes
in the panels and then used self tapping sheet metal
screws to attach the panels. I used the type of screw
that has a mini-drill-bit built in so I didn't have to
drill a pilot hole in tight quarters. I kept hole spacing
at under 4-inches.
The top edge of the panels
sits in the channel that runs just behind the package
shelf. Position the panels in place before you drill the
mounting holes as some minor tweeking with a small hammer
will be necessary to get a good fit. A couple of c-clamps
helps to hold the four panels together during fitting. I
would then mark the location of the panels and drill any
holes needed. Before you finally attach the panels,
remove them and run a bead of butyl caulk where the panel
will contact the body or another panel. This is not for
sealing out gas. It is to prevent vibration from the rear
speakers causing any rattling sounds when the radio
volume is high. I also painted the panels to match the
trunk before the final installation.
SIDE BENEFIT
I found that if I packed the
space between the rear seat and the blast panel with
dacron fiber ( the kind you get for padding or pillows at
the fabric store) the sound from the rear speakers was
greatly improved. It somewhat forms an infinite baffle
enclosure and gives a good bass without being boomy.
I have searched extensively
for the film of the Mustang rear end crash. It was
available at a couple of sites a few years ago, but seems
to have disappeared.
Copyright Dale Thompson.
Last revised: September 30, 2006.


